Order Free Samples CLICK HERE
Thank you for making the excellent choice of purchasing your brick slips from Slips From Stock. We have have taken it upon ourselves to collate everything you need to know in order to install your brick slips into this one blog article!
As the old adage goes, fail to prepare prepare to fail. So it should come as no surprise that the same rings true when it comes to the install of your brick slips. You’ll first want to clean the surface you plan install your brick slips to. Make sure it is free of any dust and debris. This is because if your wall is not prepared correctly it could lead to your adhesive failing or not preforming to the best of it capabilities. This stage of your brick slips install should only take a few minutes but is arguably the most important.
After you have cleaned the wall, you should begin priming it. Our brick slip primer ensures the wall is in the most suitable condition for the application of adhesive. Regardless of whether your project is an interior or exterior one you should definitely be using primer. In the product description of the primer you’ll find a list of all the suitable surfaces for the brick slip primer. You can also view the manufacturers guide here. We have only ever tested our primer with our Slip-Fix adhesive so we’d only ever recommend doing the same.
This is the part of the brick slip install process that people look forward to the most. Your first action should be to take your mixing bucket and pour half of the bag of Slip-Fix into it. Now, pour roughly 2.5 litres of cold clean water into the mixing bucket. You’ll want to mix periodically and using a mixing paddle will make this significantly easier for you. However, you can to mix this by hand. You should continue mixing until you have achieved a slump free mixture. Normally, this takes around 3 minutes to achieve, but if it takes you longer, don’t worry.
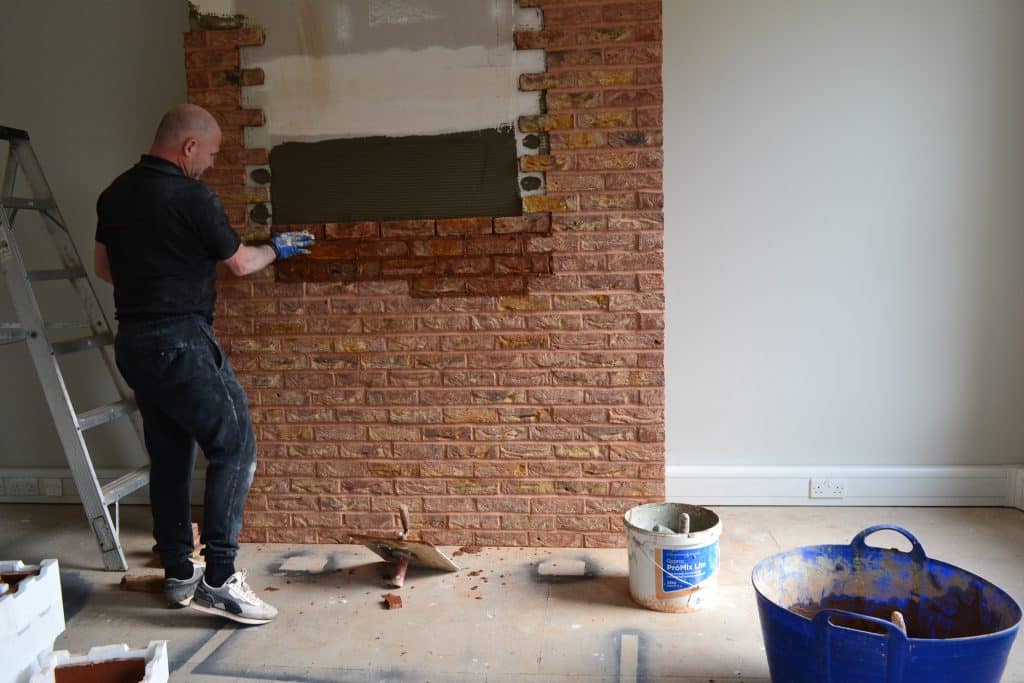
Once you have prepared the mixture, it is time to begin applying it to the wall, using your notched trowel. Ideally you’ll want to do this 1m2 at a time if this is your first attempt at a brick slip install. This is to avoid the adhesive setting before you’ve had a chance to apply your brick slips. You’ll want to take your first brickslip and apply it firmly and evenly into the adhesive. Your adhesive should have sufficient grab to hold the brickslip in place with minimal sag.
Once your first brickslip is in place take a 10mm spacer and place it in the adhesive on the end of the brickslip. Following on from this, take your next slip and repeat the process. Continue doing this across your whole bottom row. When you reach the second row you’ll want to do the same again with one slight change. When placing your spacers, place one below your brick slip as well as at the end of it. This will keep your joints equal throughout the whole project. This is especially important when installing brick cladding as no one wants the outside of their home to look uneven.
Now your brick slips are have been stuck to the wall, it is time to install your mortar. To start, you’ll need to pour the full bag of Slip-Point mortar into a mixing bucket. You can use the same bucket as you used for your adhesive however, make sure you clean it first. The next step is to add between 4 and 5 litres of cold clean water and mix thoroughly. A mixing paddle would be very useful when your doing this. Keep mixing until you have reached the correct consistency. You will be able to know if you take some of the mixture, loading it onto the trowel and turning it upside down. If it can resist the pull of gravity and not fall off, you’ve got it perfect!
Following on from this, you’ll want to take your brick slip pointing mortar and load it into a pointing gun. Make sure you fill it to around 3/4 full and insert the plunger. Now, squeeze the trigger carefully into the joint. This will give you a smooth and consistent flow of mortar. It is important to aim for the centre of the joint and allow the whole joint to fill before moving on. It is okay if your mortar joints don’t look perfect at this stage as we will be able to amend this in the next stage.
We are now approaching the final stages of your brick slip install. All that is left is to tidy everything up a little bit. If you are using the tools from our brick slip installation kit, now is the time to make use of your brick jointer. Starting with the vertical joints first, gently push the jointing tool along the length of the joint to leave a smooth and even finish. This will leave you with a flush mortar joint. Once you have done the vertical joints, it is now time to move onto the horizontal joints and repeat the same process. Please don’t rush this phase, as you have come so far on your brick slips install journey so it would be a shame for things to go wrong now.
There is a high chance that whilst you install your brick slips, you will end up leaving some mortar residue on the face of the bricks. This is not something to fret over as with the use of a stiff wire brush the residue can be easily removed. Simply brush the affected parts with the wire brush making sure not to be too heavy handed. Otherwise, you risk scuffing the scuffing the face of the brickslip. As soon as the residue has been cleared and the mortar joints smoothed, you have finished the main part of your brick slips install!
Now you have finished the actual install of your brick slips, it can be easy to bask in the glory of the job you have just completed. However, we’d highly recommend taking this final extra step to really solidify your work. Applying brick slip sealer post installation will keep your brick slip wall tiles looking fresher and newer for longer. In most cases, just a single coat of our surface treatment sealer will suffice. If your brick slips are install in a place that is liable to come into contact with food or drink spillages i.e. in a brick slip kitchen it is imperative that you seal them.
The sealer is perfectly fine to use in both internal and external brickslip projects. It will prevent liquid ingress whilst allowing the slips to remain vapour permeable. Furthermore, it will be most effective if you apply it before your feature wall dries. After this, the only aftercare your project will require is the occasional dust down and then your good to go!
Our sales team can help you with your choice of brick slip and can also assist with working the quantities that you require for your project out also, including Slip-Fix adhesive and Slip-Point mortar. Feel free to use our brick slip calculator on our site or, for more complex projects, please send your drawings over to sales@slipsfromstock.com and a member of the estimating team will respond within 24 hours. For large trade customers, we recommend visiting TBS Cladding Solutions. We want to thank you for choosing Slips From Stock as your brick slip supplier! So once your slips have been installed post them on Facebook or Instagram and we’ll send you an Amazon voucher! Our team works tirelessly around the clock. We are experts on all things brick slips and also offer a FREE brick slip matching service. Simply email us at sales@slipsfromstock.com or call us at 01889 227183.